Although, there are many options to move data to Azure, the most popular way is to use Azure Data Factory service.
Azure Data Factory – Overview
Azure Data Factory is a serverless data integration solution for ingesting, preparing and transforming data. It allows to visually integrata data sources via more than 90 built-in connectors.
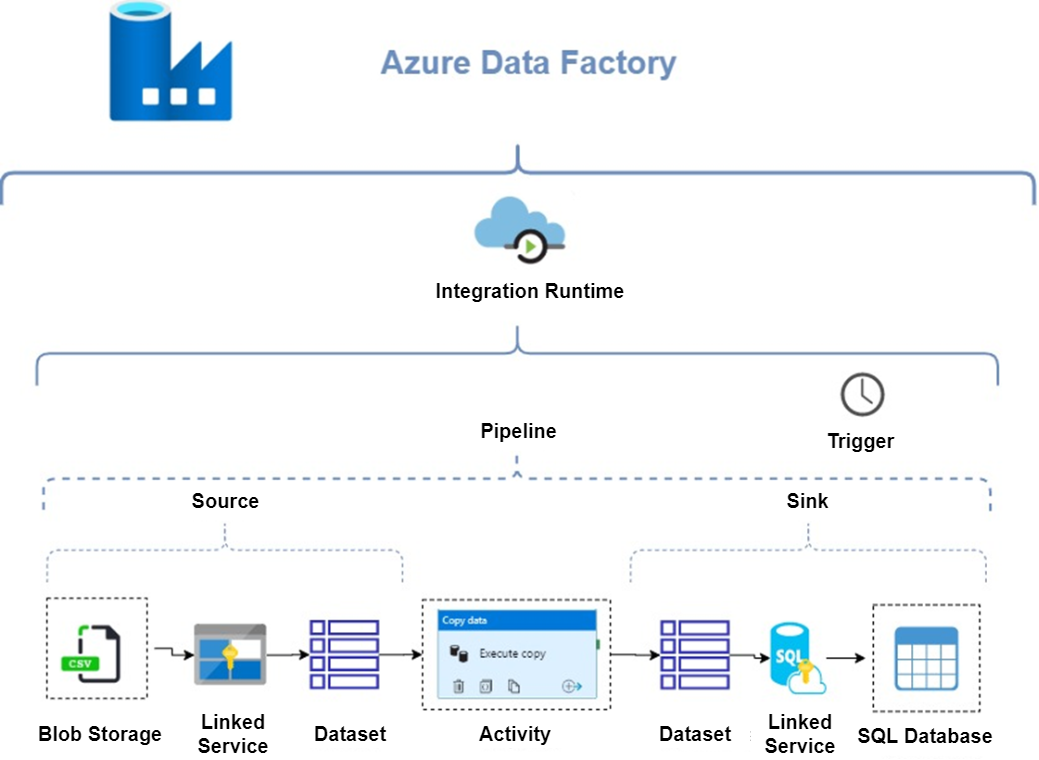
Following diagram demonstrates main components of Azure Data Factory and explain how it works.

Integration Runtime – the core component of Azure Data Factory, the compute infrastructure used by ADF to provide data integration capabilites.
Pipelines – logical grouping of activities that perform as task
Activity – defines action performed on data like copy data, execute store procedure etc.
Trigger – allows to execute pipelines either on-demand or scheduled
Linked Service– connection string that allow to define connection between source, sink data and Azure Data Factory
Data Set – defines a format and definition of processed data
There are three types of Integration Runtime
1. Azure – allow to ingest data only from cloud data stores and integrate and transform data in Azure.
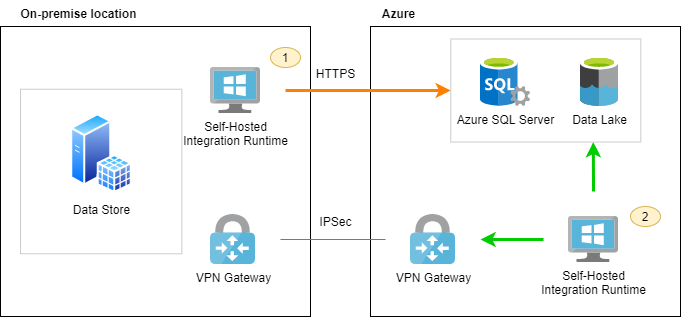
2. Self-hosted – allow to ingest data from both cloud data stores and data store in private network, then integrate and transform data in Azure.
3. Azure-SSIS – allow to run SSIS packages.
The most popular type of Integration Runtime is Self-Hosted because of business needs related with ingesting on-premise located data. Self-Hosted Integration Runtime can be installed either on on-premise machine (option 1) or virtual machine hosted in Azure (option 2).

More secure connection between two networks is available via site-to-site VPN Gateway or Azure ExpressRoute. For more details about VPN Gateway please refer to Microsoft documentation
Use Case – data ingestion from SQL Server to Azure SQL Database via Azure Data Factory
Main goal of this use case is to demonstrate how to ingest data from multiple tables stored in on-premise SQL Server and load data into Azure SQL Database with minimal code effort. Data will be transfered from many tables using single Azure Data Factory pipeline.
1. ETL Configuration Table
Create new table ([audit].[etl_config]) in database, then insert name of tables and columns that you would like to copy. Azure Data Factory will read configuration records , pass each of them as parameter and copy data between source and destination database in a single pipeline.
2. Create Linked Service
Linked Service is required to create authentication from Azure Data Factory to source and target database. It will be used later on as a reference.
Open Manage Tab in Azure Data Factory and create a new Linked Service for both Source (RepositorySrc) and Destination (RepositoryDWH) Databases.
3. Create Dataset
Dataset is needed to define tables that will be used in copy activity. Name of the table can be parametrized and passed automaticaly in a pipeline.
Open Author Tab and create 3 datasets (ETL_Config, SourceDataset, TargetDataset). Source and Target Dataset should be parametrized. Before you type a parameter, you need to go to Parameter tab and create them.
4. Create Pipeline
Pipeline is the main component that contains all activities performing as a task.
Create a new pipeline and add 2 activities (Lookup, ForEach)
4.1. Lookup
Lookup activity is used to select source, destination table details from Configuration table (additionally filtered by active flag).
select * from audit.ETL_config where active=1
Change Name of Lookup activity to Table List
4.2. ForEach
ForEach activity is used in order to executy Copy activity in a loop for each record selected from SQL Table in Table List activity (please refer to 4.1. Lookup). Thanks to Lookup and ForEach activities, you don’t need to create many copy activities for each dataset. The same copy activity can be executed in a loop based on ETL configuration table defined in point 1.
• Change name to LoadEachTable
• Set Batch count (number of parallel activity execution within ForEach) in Settings Tab
• Add Items dynamic content from activity outputs.
@activity('Table List').output.value
• Add Copy data in Activites Tab
4.3. Copy Data
Copy Data is used in order to move data from one database to another one. Table names are passed as parameter. Copy Data activity is executed in a loop defined in point 4.2.
• Define Source settings
Source Dataset = SourceDataset
Query = following select statement (single record of ForEach is defined as @{item() })
SELECT @{item().column_list}
FROM @{item().source_schema_name}.@{item().source_table_name}
• Define Sink settings
Source Dataset = TargetDataset target_schema_name=@item().target_schema_name target_table_name=@item().target_table_name
pre-copy script = following select statement
IF OBJECT_ID('@{item().target_schema_name}.@{item().target_table_name}') IS NOT NULL
TRUNCATE TABLE @{item().target_schema_name}.@{item().target_table_name}
Thanks to parameters and configuration table, all data is copied via single pipeline and only one copy data activity. Whenever you would like to add more tables to your ETL proces, you can manage [audit].[etl_config] table in your database
5. Audit
Once core ETL process is created and managed by configuration table, don’t forget to create Audit process. Most likely, it will be covered shortly in next post.