There are 3 options to create your own blog in Azure.
1. Create App Plan Service
2. Create Web Server service (Container Instance)
3. Create Virtual Machine that hosts Web Server
Requirements
1. Blog has to be available 24/7
2. User friendly interface for adding new posts
3. Minimize cost
4. No physical infrastructure, hardware
5. Highly scalable and stable solution
6. Static website
Cost
Based on above requirements, monthly cost estimation was provided in following table. As this is a simple static blog, the best option (minimize cost) is to create virtual machine (Ubuntu) that will host Web Server.
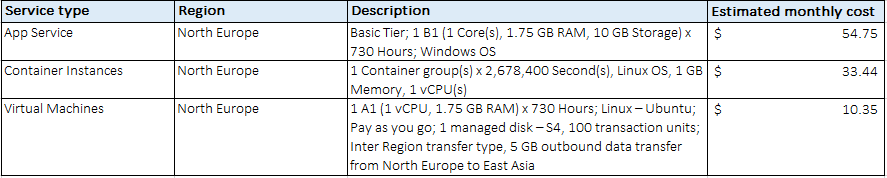
Please keep in mind that you can use Azure trial subscription that allow to create most of Azure services (basic pricing) for free for 12 months. It is a great opportunity to get hands-on experience in Azure. It significantly reduces blog cost from 10.35$ to 1,54$ (managed disk for Ubuntu is out of scope of free subscription) for first 12 months
Instruction
As we, already decided which Azure service should be used, let’s create virtual machine in Azure and install all needed components on the machine.
Create Resource Group
Open Azure Portal and select assigned subscription. As a next step, we will create a resource group.
A resource group is a container that holds related resources for an Azure solution. Resource Group is a cost-free service. You pay only for resources created within Resource Group.
1. Create a resource -> Resource Group -> Create
2. Type Resource Group name -> Next: Tags
3. Fill Tags -> Next: Review + create
4. Create
Your resource group is created.
Create Virtual Machine
Now, it is time to create a Virtual Machine that will host your Web Server.
1. Create a resource -> Ubuntu Server 18.04 LTS -> Create
2. Select previously created Resource Group, type Virtual machine name, select nearest region, and smallest size (Standard_B1s) to reduce cost.
3) Select Password authentication Type, add username and password
4) Allow inbound ports 22 (ssh connection), 80 (web traffic) -> Next: Disks
5) Change OS disk type to Standard SSD to reduce cost -> Next: Networking
6) Leave others as default, go to Tags, fill them, Review + Create
7) Create
Your Virtual Machine, Virtual Network, Public IP address, Network Security Group, Network Interface and Managed Disk is created now.
Configure Web Server
Once you have all components created in Azure, let’s log-in to Virtual Machine
1. Search your Virtual Machine and copy your public IP address available in Overview section.
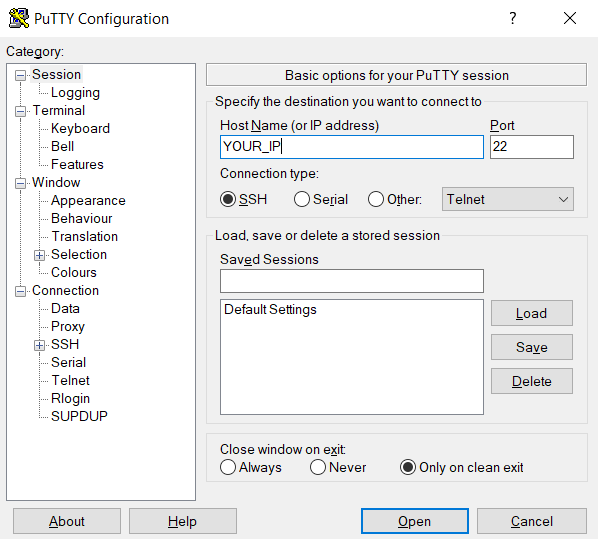
2. Download and Install PuTTy
3. Open PuTTy, add IP address -> Open
4. Install Apache, MySQL and PHP
sudo apt update && sudo apt install lamp-server^
Improve security of mysql by setting root password, removing anonymous user, disallowing root login remotely, removing test database and reloading privilege tables.
sudo mysql_secure_installation
WordPress
1) Install WordPress
sudo apt install wordpress
2) Configure WordPress
Open mysql
sudo mysql -u root
Create WordPress database
 CREATE DATABASE wordpress;
 GRANT SELECT,INSERT,UPDATE,DELETE,CREATE,DROP,ALTER
 ON wordpress.*
 TO wordpress@localhost
 IDENTIFIED BY 'yourPassword';
Quit, then configure PHP, by runing following command to open a text editor of your choice and create the file /etc/wordpress/config-localhost.php
sudo sensible-editor /etc/wordpress/config-localhost.php
Copy the following lines to the file, substituting your WordPress database password for yourPassword (leave other values unchanged). Then save the file.
<?php
define('DB_NAME', 'wordpress');
define('DB_USER', 'wordpress');
define('DB_PASSWORD', 'YOUR_PASSWORD');
define('DB_HOST', 'localhost');
define('WP_CONTENT_DIR', '/usr/share/wordpress/wp-content');
?>
Move the WordPress installation to the web server document root:
 sudo ln -s /usr/share/wordpress /var/www/html/wordpress
 sudo mv /etc/wordpress/config-localhost.php /etc/wordpress/config-default.php
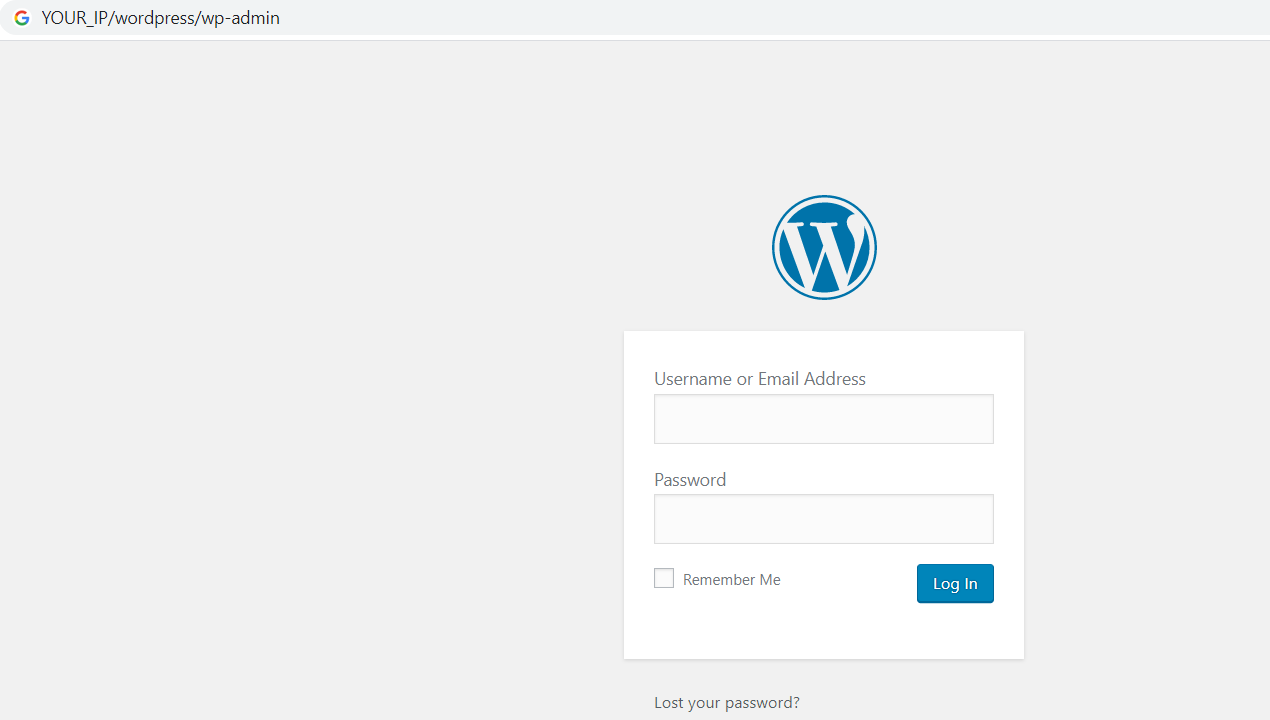
Open a browser and go to http://YOUR_IP/wordpress/wp-admin